Showing posts with label craft shows. Show all posts

Friday, August 19, 2016

Paperclay or Papier Mache? Well That Depends

If you've been following me lately, you know that I've been busy getting ready for my 3 upcoming shows, making as many items as I can so my booth is well stocked. To me, if you don't have a full booth, it doesn't look good and I think buyers are less likely to come in to shop. We can talk booth set up later...

So with that, I want to talk about my sculptures that I create. Unlike many artists out there, I don't mind sharing. There's no "secrets" or hidden techniques on how I do things. There's really nothing new to working with clay or papier mache. All I can add are my own tips that help me.

First, if I want to cover something more quickly, I will use papier mache as my base. It's cheaper and goes on easier than paper clay. You can come back later after it dries and add paper clay details if you want.

When working with papier mache, OMG it's a mess, but a fun mess! I use Fastmache. It comes in a box and you mix it with warm water. Put whatever amount you want to start with into a Ziploc baggie so you can seal it and knead it. Start slow on adding the water. I like to end up with a kneadable dough almost like clay. You don't need to worry about getting all the lumps out, that's what gives it tooth and texture and keeps it from looking pretty-boy perfect. Also, I add a drop of Dawn dishwashing liquid. It's supposed to aid in any mold that might form, though I've never ever seen that happen even years later. Oh well, add it cause it doesn't hurt your mixture either way.

When applying your mixture over your armature, like a styro ball or foil, as you work, wet your fingers to keep the mix from sticking to your hands. I keep a bowl or a cup of water handy to keep dipping. Helps with smoothing also!

Before you start working in details or smoothing it out, let it dry for a bit. Just till it's slightly tacky then go in and smooth over with a wet finger. You can also use a wet paintbrush. I've found that works well also. 
This is the head of my pumpkin man below. The papier mache is covering a Styrofoam ball with a dowel inserted to later put into his base. Because I live in a humid climate, it took a few days to dry. That's ok, other stuff to work on!

This is my finished piece. I'm very happy with him and think he's a real cutie! His expression just makes me smile!  Now, to paint him, you don't need to apply anything special to seal it. Acrylic paints seal. That's all I used, just cream color acrylic paint. Then after he was dry, I washed over a thinned brown paint and wiped off to give an antique look.


Here are a few more heads drying. I'm going to be making some pumpkin wands and also some "make-do's" which to me are just heads on top of something. I'm using painted candlesticks. These took a few days to dry cause of the damp weather.

Onto paper clay. I don't like just any brand of air dry clay, I prefer Creative Paperclay. It's just a better quality I find. You'll pay slightly more but I think it's worth it. I will admit though I do use the lesser known brands occasionally when I'm just doing something small, like an accessory to my larger sculpture. Ok, so let's talk about it.

Unlike papier mache, paper clay is smoother and more of a finished look. I tend to be more of a perfectionist when working with clay than with papier mache. I want it to look very smooth and get out any lumps, bumps or imperfections. I drive myself crazy trying. Or crazier rather!
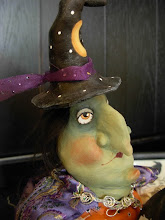
Here's my witch head out of paper clay. You can see the difference in the texture between the papier mache and clay. The technique is not much different really other than you can really push and pull the clay into areas and you don't get the same sticking issue. I still dampen my fingers to help with any stickiness and also to smooth or blend areas together. Don't use too much water though or you could get cracking when it dries. I use clay tools to help blend in added clay to the piece such as for a nose or cheeks. You can pick those up very inexpensively at local craft stores. The cheapo plastic ones work just as good as the metal I found.

Some artists apply a coat of Gesso to the piece after it's dried and before painting. I've done it both ways and don't find a lot of difference really. The acrylic paint still sticks and covers just as well.
So for the witch, I applied my acrylics, let them dry and then went back over with a couple washes of various shades of green and then a brown for some antiquing. Finally I sealed with a satin waterbase varnish. You could leave unsealed as well because as I said, acrylic paints do act as sealers as well.


This head, out of papier mache, is going to be something I've not created before really. It doesn't look like much now, maybe you can make out the nose and cheeks. This will be a sweet doll. Hopefully. Her face will be sanded smoother, still keeping some of the "tooth", and then painted in soft, natural colors, much like dolls were in the old days. Not sure yet of the hair or the rest. She'll be a work in progress. I'll post pics as I'm going along.

Do I prefer paper clay over papier mache? No, not really. It just depends on what I'm making and the desired outcome I want.

Thursday, July 7, 2016

She Said Create!

Summer is in full swing here in middle Tennessee and NOW I remember why I want to move! Hot, humid, storms, bugs...need I say more. Oh well, Fall will soon be here and all will be well in my world once more....

But in the meantime, I'm preparing for two upcoming shows for Fall and Christmas that I'm excited about! I love doing shows because I not only get to sell my art to people who appreciate it, but I also get to meet other vendors that are so nice. It's really fun! I may be adding a third show somewhere in between but we'll see because that means you have to have an awful lot of stuff made and right now I've got a little glitch in the process.

A few weeks ago we came upon 4 stray tiny, tiny kittens that were dumped in the bushes down the road from us. Sad I know. They were wet from the rain, shivering, and shaking in the road so we picked them up and are caring for them. In my house. In my craft room. They've since perked up and are tearing around, into everything and well, being kittens. Adorable.

So I've had to relocate my work area. And it's not working. Hmmm...not much area to choose from to set up in this small house. Tried the 3rd bedroom, not working. Dining room? Maybe. Better get it figured out really quick cause I've got to get to making things!
What will I be making? Monster dolls, maybe some voodoo dolls too. Lots and lots of painted items. Some clay sculptures. Maybe some stitchings. And jewelry. Yes I know, I have a love/hate relationship with it but I really do like making it! LOL! I get fueled and inspired by other jewelry artisans and it gets my own creativity flowing.

Back to my craft area. Oh how I wish I just had ONE BIG craft studio! I've just GOT to figure this out!
A shed turned into craft room? Like it!

She shed craft room
LOVE!
Wow, that'd be amazing!
This could work....
I may have to settle with just working on my dining room table for awhile. Sigh............


Wednesday, May 25, 2011

Creating your Crafty Space

Life is good, my mind is clear, and my heart is happy, so I'm ready to get back into creating again! Making art is such a huge part of who I am, that my studio needs to reflect my personality and be a place where I just love to spend lots of time. So with that, I've been looking at ways I can freshen up my favorite spot!


Sweet a la shabby chic
While I look for inspiration in all sorts of places: magazines, books, my favorite blogs, craft stores, just anywhere where I can get the juices flowing, I also look to my creative space. Here are just a few of some of my favorite art spaces that I've been collecting. Maybe you too can use some of these great ideas to incorporate into your own creative haven!


When designing your creative space, I think the first thing to think about, at least for me, is will this space inspire my creativity? And speaking for myself, one of the most important elements is ambiance. Being surrounded by beautiful things; a chandelier perhaps, or maybe jars of gorgeous beads, even some twinkly lights trimming a window or ceiling. And color. Lots of brightly displayed color pencils and markers, glitters, paints, fabrics, ribbons. You get the idea! Don't forget wall color. Paint the space with your favorite colors! I've seen incredibly luxurious studios with delicious shades of peaches and creams, or fun spaces with turquoise, lavenders, and pinks. Whatever your heart desires!
So colorful!


Let's talk about organization for a minute. Another reason you are even creating this wonderful space is so you can find things. Am I right? Invest in cabinets, shelving, little boxes, jars, wire baskets, wicker baskets, cork boards, decorative hooks, even garden pots that can hold brushes or pencils. I love those new slim "ledges" - mini versions of shelves, that can display collections - another great source of inspiration! Garage sales and flea markets are a great place to find old hutches, desks, bookcases for your storage needs. And don't feel you have to have everything match either. That's the fun of creating a space just for you! You can do whatever you love.


I think this is a great use of space; re-purpose the closet in your craft room or studio into another working space. Say for sewing, or scrapbooking. Add shelving, maybe a cabinet, a flip down table onto the wall, and voila! another space-saving working area.

Great closet space
A few ideas that I've used: I bought a large cork board and painted the frame red with white polka dots (festive!). I'd been gathering ideas; newspaper clippings, photos of cottages I loved, gardens I wanted to recreate, pictures of gorgeous bracelets I wanted to try making, cute note tags I received with gifts, postcards, patterns I wanted to buy, etc. All this "stuff" I put into a manila folder. Now I just pin them up to my cork board and look there for added inspiration. So great!

Another idea? For my last craft show, I made some displays for my wood Christmas ornaments to hang from. One of them was a section of chicken wire framed with 2x4's and mounted on legs. I took off the leg portion and mounted the framed chicken wire section on one of the walls to display some of my finished items or things I am currently working on. I use little wooden clothespins to hold things onto the wire.

For me, my favorite craft rooms seem to be the ones that resemble kitchens. Not sure why that is? But I love all the cabinetry and countertops. I love everything to have it's spot, so I think it'd be a dream to have a space like that. I am also a BIG fan of recessed lighting. I think how it illuminates my kitchen work area so well, that it would be wonderful to have it in my craft studio also. (Note to self: Add to bucket list!). Take a peek at some of my favorites:


Gotta love the chandelier!


Other ideas to incorporate:

Wall words or favorite sayings: Create, Dream, I Make Things......
Collections (I have my snowman collection on the top of all my bookcases that hold my supplies)
Good music
Twinkly lights or fun novelty lighting (I use pumpkin lights during the Fall)
Candles
Chalk board